You walk into the kitchen on a sticky 85-degree morning needing caffeine fast. Pouring hot coffee over ice cubes just leaves you with a lukewarm, bitter mess. Spending six dollars at the local cafe every single day drains your wallet fast. Making cold brew coffee at home solves both problems with about five minutes of hands-on effort. You mix coarse coffee grounds with cold water and walk away. The long steeping time extracts all the sweet chocolate notes while leaving the bitter acids behind.
The secret lies in the ratio and the clock. Heat forces coffee grounds to release their oils and acids instantly. Cold water needs 12 to 24 hours to do the same job. You just need a large jar, a reliable filter, fresh coffee beans, and filtered water. Your kitchen counter does the heavy lifting overnight. Tomorrow morning rewards you with a smooth concentrate you can dilute exactly to your liking.
A standard batch yields enough concentrate to last an entire week in the fridge. That means Sunday night prep gives you instant morning relief until Friday. Buying a bag of whole bean coffee for twenty dollars creates about twelve large glasses of cold brew. You save money immediately while controlling the exact strength and flavor profile of your morning cup.
Choose the Right Coffee Beans and Grind Size
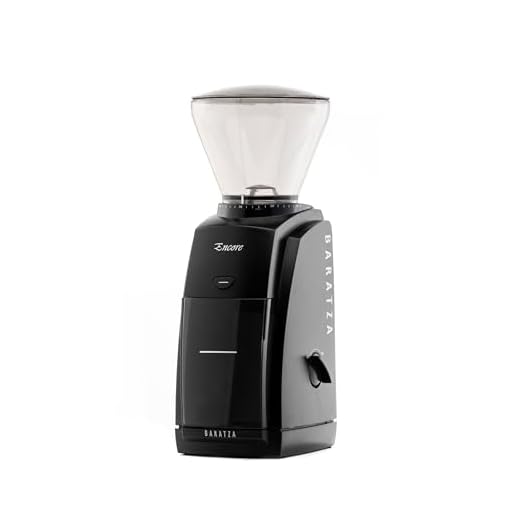
Start with a dark or medium roast to get those classic chocolate and caramel flavors. Light roasts work but often produce a highly acidic, tea-like cold brew that gets lost when you add milk. You want a coarse grind setting. Think raw sugar or coarse sea salt. Fine espresso grinds turn into a dense mud block in the water. The fine particles over-extract and create a harsh, bitter taste. Burr grinders produce the most consistent coarse pieces.
Fresh beans matter just as much as grind size. Old beans sitting in a supermarket bin for six months lose their volatile oils. Buy freshly roasted beans and grind them immediately before mixing your batch. If you lack a quality burr grinder at home, ask your local coffee shop to grind the bag on their coarsest French press setting. The pre-ground bags at the grocery store are almost always too fine for a proper cold brew steeping process.
Measure Your Coffee to Water Ratio
Cold brew requires a specific recipe to create a versatile concentrate rather than weak coffee. The golden rule is a 1-to-4 ratio by weight. You mix one ounce of coarse coffee grounds with four ounces of cold water. A simple starting recipe uses one cup of ground coffee to four cups of filtered water. This creates a strong concentrate. You will dilute this liquid later in your glass. Eyeballing the measurements often leads to inconsistent batches.
A digital kitchen scale provides the most accurate results for your daily brewing routine. Weighing exactly 100 grams of coffee and pouring 400 grams of water removes all guesswork. Volume measurements fluctuate based on exactly how coarse your grinder breaks the beans. Filtered water makes a massive difference in the final taste. Tap water containing heavy chlorine or minerals will mute the subtle sweet notes of your beans. Always use cold or room-temperature filtered water.

Combine and Steep Your Mixture
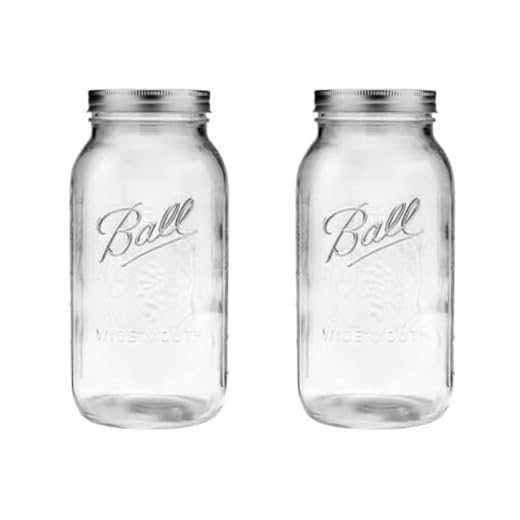
Grab a large glass mason jar or a dedicated cold brew pitcher. Add your coarse coffee grounds to the bottom. Pour the filtered water over the grounds in a slow circular motion. Make sure every single particle gets wet. Dry pockets of coffee will ruin your extraction and leave the final batch tasting weak. Use a long wooden spoon to gently stir the top layer of grounds down into the liquid. Cap the jar tightly.
Leave the jar resting on your kitchen counter out of direct sunlight. Room temperature water extracts the flavors faster than cold water. The magic happens between 12 and 18 hours. Steeping for exactly 16 hours hits the sweet spot for most medium and dark roasts. Leaving the mixture for more than 24 hours pulls out unwanted woody flavors. Setting an alarm on your phone prevents accidental over-steeping.
Strain the Concentrate Properly
The waiting period ends and the filtration process begins. You need to separate the muddy grounds from the liquid gold. Set a fine mesh sieve over a clean bowl or a second large glass jar. Line the sieve with a paper coffee filter or a clean flour sack towel. Pour the coffee mixture slowly into the lined sieve. Gravity handles the rest of the job over the next ten minutes.
Never squeeze the paper filter or press the grounds with a spoon to extract more liquid. Forcing the liquid pushes fine sludge and bitter oils into your clean concentrate. Let the liquid drip naturally. Discard the spent grounds into your compost bin. If the resulting concentrate looks cloudy, run it through a fresh paper filter one more time. A clear, sediment-free liquid lasts much longer in the refrigerator without turning sour.

Store and Dilute Your Cold Brew
Transfer your filtered cold brew concentrate into a clean glass bottle or airtight pitcher. Keep it in the refrigerator immediately. The cold temperature halts any lingering chemical reactions and preserves the smooth flavor profile. Pure cold brew concentrate stays fresh for up to two weeks in an airtight container. Oxygen degrades the taste quickly. A container with a tight seal prevents the coffee from absorbing odors from yesterday’s leftover dinner.
Drinking straight concentrate will jolt your system with massive amounts of caffeine. You must dilute the liquid before taking a sip. Fill a tall glass with ice cubes. Pour in one part coffee concentrate and one part cold water or milk. A 50/50 split creates a standard iced coffee strength. Adjust the ratio to match your personal preference. Adding a splash of simple syrup or vanilla extract mimics the fancy drinks at your local cafe.

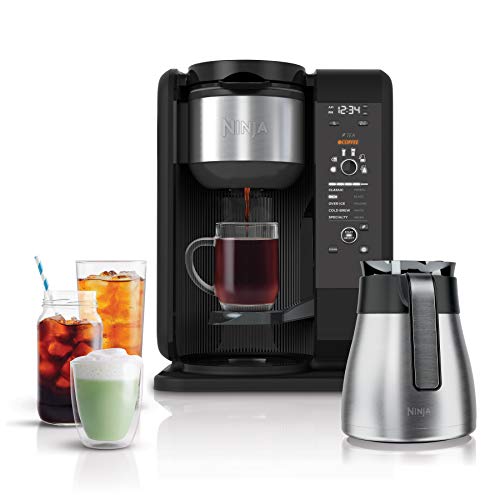
Upgrade with Dedicated Cold Brew Makers
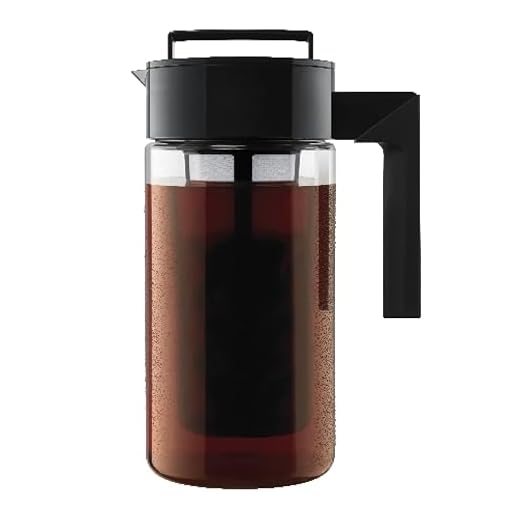
Mason jars and paper filters work perfectly for beginners. Moving up to a dedicated cold brew maker streamlines the weekly routine. These devices feature built-in fine metal or nylon mesh baskets. You dump the grounds into the center column and fill the surrounding pitcher with water. The built-in filter keeps the mess contained and speeds up the cleanup process. A good cold brew pitcher fits neatly in the refrigerator door.
French presses also serve as excellent cold brew tools. You combine the coarse grounds and water directly in the glass carafe. After 16 hours on the counter, you simply press the metal plunger down to separate the grounds from the liquid. Pour the concentrate directly into your storage jar. This method eliminates the need for disposable paper filters entirely. Just remember to dismantle and scrub the metal mesh screen thoroughly between batches.
Troubleshooting Common Flavor Issues
Sometimes a batch comes out tasting overly bitter or sour. A bitter and harsh taste usually points to over-extraction. You likely ground the beans too fine or let the mixture steep past the 24-hour mark. Next time, bump up the grinder setting to a coarser level and stop the steeping at 14 hours. Squeezing the filter bag during the draining phase also injects bitter tannins into the final batch.
A sour or watery batch indicates under-extraction. The cold water did not have enough time to pull out the sugars and body. Increase your steeping time to 18 hours. A weak flavor can also stem from using too much water in your initial ratio. Stick strictly to the 1-to-4 coffee-to-water ratio by weight. Always verify your water temperature. Using water fresh from the refrigerator slows down extraction considerably compared to room temperature water.
Quick Tips
- Make coffee ice cubes using leftover cold brew concentrate so your drink never waters down on hot afternoons.
- Create simple syrup by boiling equal parts water and granulated sugar until clear for easy liquid sweetening.
- Grind your beans in small batches right before brewing to keep the volatile oils intact for maximum flavor.
- Mix one part concentrate with two parts hot water if you want a smooth, low-acid hot cup of morning coffee.
- Clean your storage jars with hot water and baking soda to remove stale coffee oils between weekly batches.
Frequently Asked Questions
Making cold brew coffee at home requires little more than patience and a good kitchen scale. You mix coarse grounds with filtered water, wait 16 hours, and strain the liquid into a jar. This simple weekend routine stocks your fridge with enough high-quality caffeine to get you through the entire work week. You stop wasting money at the drive-thru and gain complete control over your morning cup.
Start your first batch tonight before you go to bed. Grab a clean mason jar, weigh out one hundred grams of your favorite medium roast, and add four hundred grams of room-temperature water. Tomorrow morning, you will wake up to a fresh batch of smooth concentrate ready for ice and a splash of milk.