You are standing in front of a chaotic shelf looking for a single can of diced tomatoes while your dinner burns on the stove. Bags of half-eaten chips tumble onto the floor. Spilled flour coats the bottom shelf. A disorganized pantry costs you money in duplicate groceries and wastes your time every single day.
Organizing this space requires pulling everything out and starting from a blank slate. You will find expired cans from three years ago and spices that lost their flavor last winter. Sorting your food into logical zones makes cooking faster and grocery shopping much cheaper.
You need a weekend afternoon and a few sturdy trash bags to tackle this project right. The process takes about three to four hours for a standard walk-in pantry or two hours for a smaller reach-in cabinet. Turn on some music and put on comfortable clothes. By tonight, you will know exactly where your snacks and baking supplies live.
Empty the Entire Space and Clean the Shelves
Take every single item out of your pantry and place it on your kitchen counters or dining table. You cannot organize around existing clutter. Once the shelves are totally bare, spray them down with a mixture of warm water and a few drops of dish soap. Wipe away the sticky molasses rings and the mystery crumbs trapped in the corners. Dry the surfaces completely with a microfiber cloth so new moisture does not attract pests. Leaving your shelves damp creates a breeding ground for mold in tight, dark spaces.
This blank canvas gives you a realistic view of how much space you actually have. Measure your shelf depth and height right now. Write those numbers down on a piece of paper. Most standard pantry shelves are 12 to 16 inches deep, with about 10 to 14 inches of vertical clearance between them. Knowing these exact dimensions stops you from buying storage bins that stick out too far and prevent the door from closing. You also need these measurements to figure out if tall cereal boxes will fit on your middle shelves.

Check Expiration Dates and Toss the Old Food
Sort through the massive pile of food on your counter and look at the stamped dates on every package. Throw away the stale crackers, the rock-hard brown sugar, and the canned beans that expired two years ago. Most canned goods stay safe to eat for up to five years, but their quality drops sharply after 18 months. Toss out anything that looks bloated, smells off, or has a broken seal. Expired baking powder and yeast will ruin your baked goods, so throw those out immediately if they are past their printed date.
Set aside unopened items that are still good but you know your family will never eat. Put them in a cardboard box and drop them off at a local food bank. Consolidate your duplicates next. If you have three half-empty bags of penne pasta, pour them all into a single airtight container. Reducing your volume right now makes the actual organizing process much faster and cheaper. You do not want to buy expensive organizers to hold food that belongs in the garbage.
Categorize Your Groceries into Functional Zones
Group your remaining food into distinct categories based on how you cook and eat. Put all your baking supplies like flour, sugar, baking soda, and chocolate chips together. Create a designated breakfast zone for cereals, oatmeal, and pancake mix. Gather your quick meals like pasta, canned soups, and rice into a dinner preparation pile. Place kids snacks in their own separate group. Keeping similar items together stops you from hunting across three different shelves just to bake a batch of cookies.
Assign these categories to specific shelves based on their weight and frequency of use. Heavy items like bulk rice, large bottles of oil, and cases of water belong on the floor or the lowest sturdy shelf. Keep everyday dinner ingredients at eye level. Store lightweight, infrequently used items like holiday cookie cutters and spare paper towels on the very top shelf where they stay out of the way. Reserving your middle shelves for daily items saves your back from constant bending.
Transfer Dry Goods to Airtight Clear Containers
Cardboard boxes and flimsy plastic bags create visual clutter and invite pantry moths into your food. Transfer your staples like flour, sugar, rice, and oats into clear acrylic or glass containers with silicone seals. These rigid containers stack neatly on top of one another and maximize your vertical shelf space. They also let you see exactly how much you have left before you write your weekly grocery list. Keeping flour tightly sealed extends its shelf life by up to eight months at normal room temperatures.
Label every single container right away. White chalk markers on black stickers look clean and wipe off easily when you change the contents. Write the expiration date and any specific cooking instructions on the back of the container using a piece of masking tape. A basic dry erase marker also works perfectly directly on smooth plastic or glass surfaces. Without clear labels, you will mistake baking soda for powdered sugar and ruin a recipe.

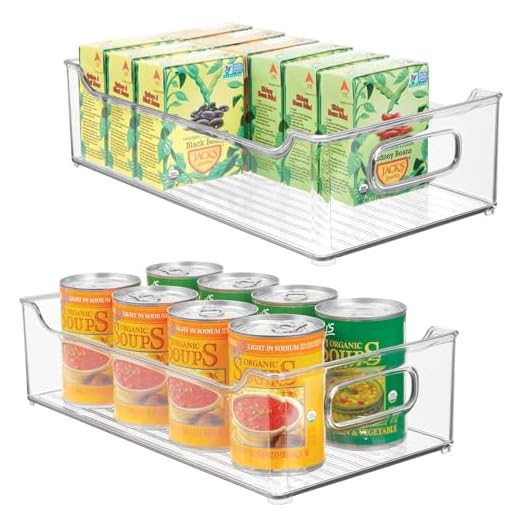
Contain Loose Snacks in Open Bins and Baskets
Granola bars, small chip bags, and fruit snacks slide all over flat shelves and create massive messes. Corral these loose items into open-top bins made of clear plastic, woven water hyacinth, or wire mesh. Open bins allow your family to grab what they need quickly and make putting away groceries incredibly fast. You can quickly toss new granola bars right into their designated bin without struggling to neatly stack individual boxes.
Size your bins according to your shelf depth to avoid wasting space in the back. A 10-inch deep basket fits perfectly on a standard 12-inch shelf. Dedicate one entire bin specifically to foods that expire soon. Train your family to check this eat-first basket before opening a brand new box of snacks. This simple habit cuts down your household food waste and saves a significant amount of money on your grocery bill.
Maximize Shelf Space with Tiered Organizers
Cans and spice jars easily get lost in the dark back corners of deep shelves. Buy a three-tier shelf riser to store your canned goods, broths, and tomato sauces. The staggered heights allow you to read the label on a can of corn sitting in the very back row without moving anything in front of it. Measure your vertical shelf space before buying risers. You need at least seven inches of clearance above the top tier to actually pull a can off the shelf.
Install a lazy Susan in the awkward, hard-to-reach corners of your pantry. These spinning turntables work perfectly for storing tall bottles of cooking oils, vinegars, and sticky condiments like honey or peanut butter. A quick spin brings exactly what you need right to the front. Stick to turntables with a slight raised lip to stop glass bottles from flying off when you rotate them. Turntables measuring 10 to 12 inches in diameter fit best in tight corner spaces.

Use the Back of the Pantry Door
The back of your pantry door holds massive storage potential for small or lightweight items. Hang an over-the-door wire rack to hold your spices, aluminum foil, plastic wrap, and small condiment bottles. This pulls these tiny, annoying items off your main shelves and frees up valuable real estate for bigger boxes and bulk foods. Heavy duty metal racks easily hold up to 40 pounds of small pantry items without warping.
Always measure the gap between the closed door and the actual shelves before buying a door organizer. You need at least four inches of clearance so the door closes completely without smashing into your cereal boxes. If an over-the-door rack does not fit, attach clear acrylic pockets or heavy-duty adhesive hooks directly to the door. You can hang aprons, reusable grocery bags, or lightweight oven mitts on these hooks to keep them accessible but out of the way.

Quick Tips
- Store root vegetables like potatoes and onions in wire baskets on the floor, but keep them in separate corners so the onions do not make the potatoes sprout faster.
- Cut the instructions off your pasta boxes and tape them to the back of your clear acrylic containers.
- Line your wire pantry shelves with clear plastic shelf liners to stop small boxes and spice jars from tipping over.
- Place your newest groceries at the back of the shelf and pull the older items to the front every time you unpack your grocery bags.
- Keep a small step stool permanently folded against the wall inside a walk-in pantry so you can safely reach the top shelf at any time.
Frequently Asked Questions
An organized pantry makes cooking dinner faster and stops you from buying groceries you already own. Setting up clear zones and pouring staples into airtight containers takes a few hours upfront but pays off every single day.
Grab your trash bags and start pulling everything off your shelves right now. Once the expired food is gone, you can measure your space and buy the exact bins you need to finish the job.


