Opening a cabinet to grab a single mixing bowl and having three plastic lids cascade onto your toes is intensely frustrating. You waste ten minutes every night digging for the paprika hiding behind giant bottles of olive oil. Your kitchen should not feel like an obstacle course when you just want to make dinner.
A functional cooking space relies on predictability. You need to know exactly where the colander is without thinking about it. Reaching for a spatula or a skillet should take two seconds.
We are going to empty every single shelf in your kitchen. You will wipe down the bare wood, sort out the long-expired cans of soup, and put your space back together in a way that matches how you actually cook.
Empty Every Cabinet and Wipe Down the Bare Shelves
You cannot organize a cramped space by simply shuffling boxes of pasta from the left side to the right side. You have to remove every plate, cup, and cereal box from your cabinets. Place everything on your kitchen counters or dining table. This step creates a massive visual mess. It also forces you to handle every object you own. You will immediately spot cracked plates, duplicate measuring cups, and appliances you have not plugged in since 2018. Leave the cabinet doors wide open so you can inspect the bare shelves.
Grab a damp microfiber cloth and a mild cleaner to wash away the dust and sticky grease rings hiding in the back corners. Spray your cleaner directly onto the cloth rather than the wood to prevent warping. Let the shelves dry completely for about twenty minutes. Now is the perfect time to install a grippy shelf liner. A textured rubber liner stops glasses from sliding around and protects the bottom of your cabinets from heavy cast iron scratches. Measure the depth of your cabinet and cut the liner with sharp scissors.
Sort Your Inventory and Throw Away Clutter
Look at the mountain of kitchen supplies sitting on your counter. Group these items into distinct categories. Put all your baking gear in one corner. Stack the dinner plates together. Gather every single piece of plastic food storage. Once you see twelve mismatched coffee mugs sitting in a row, deciding which ones to keep becomes much easier. Be ruthless about throwing things away. Pitch any plastic container missing its matching lid. Toss out those rusty baking sheets you never actually use. Donate the single-use gadgets taking up valuable space.
Move on to the food items you pulled from your pantry cabinets. Check the expiration dates stamped on every can, jar, and box. Throw away the stale crackers and the three-year-old jar of capers. Spices lose their potency after about six months. Toss any open spices that smell like dusty cardboard. Combine duplicate half-empty bags of rice or sugar into a single container. You want to reduce the total volume of stuff you have to put back away. Less inventory means less crowding on your shelves.
Map Out Your Kitchen Into Specific Cooking Zones
Professional kitchens operate on a strict zone system to limit wasted movement. You can apply this exact logic to your home kitchen. Stand in the middle of your space and identify your primary work areas. You have a prep zone, a cooking zone, a cleaning zone, and a food storage zone. You want to store items right at their point of use. Baking sheets and spatulas belong near the oven. Knives and cutting boards belong over the main stretch of counter space where you chop vegetables.
Stop storing your coffee beans on the opposite side of the kitchen from your coffee maker. Set up a dedicated morning station instead. Place your grinder, filters, coffee bags, and favorite mugs in the cabinet directly above the machine. This small adjustment saves you from pacing back and forth across the kitchen while you are half asleep. Keep your wooden spoons and spatulas in a crock right next to the stovetop. Think about your physical movement and arrange your tools to support those daily habits.
Position Daily Dishes Near the Sink and Dishwasher
Unloading the dishwasher is a chore most people hate. You can make this task significantly faster by storing your everyday plates, bowls, and glasses in the cabinets directly above or adjacent to the dishwasher. You will be able to stand in one spot and put away half the clean dishes without moving your feet. Stack your heavy dinner plates on the bottom shelf where they are easy to lift. Put the bowls right on top or next to them. Keep the delicate wine glasses on a higher shelf.
Reserve the hard-to-reach cabinets above the refrigerator or the microwave for items you rarely need. Store your giant roasting pan, holiday serving platters, and seasonal cookie tins in these remote locations. You do not want a massive turkey roaster blocking access to the cereal bowls you eat from every single morning. Keep your daily essentials between waist and eye level. You will save your back and shoulders from unnecessary strain when you stop reaching up high for heavy ceramic plates.
Store Heavy Appliances on the Lowest Shelves
Lifting a heavy stand mixer or a Dutch oven down from an upper cabinet is a fast way to hurt your back. You should always store your heaviest equipment in your lower base cabinets. Place your slow cooker, blender, food processor, and heavy cast iron skillets down low. If you have pull-out drawers in your lower cabinets, use them for these bulky items. Pulling a drawer open is much easier than squatting down and reaching into a dark cavern to drag out a thirty-pound cast iron pot.
If you only have standard base cabinets with fixed shelves, push the appliances you rarely use to the very back. Keep the blender you use for daily smoothies right at the front edge. Wrap the power cords neatly around the base of each appliance. Fasten the cords with a simple velcro tie. Tangled cords catch on other items and drag them out onto the floor. Keeping your heavy gear organized down low makes the entire kitchen feel more balanced and safer to navigate.
Contain Loose Pantry Staples with Clear Acrylic Bins
Food packaging creates massive visual chaos inside your cabinets. Cardboard boxes come in wild neon colors and odd shapes that never stack neatly together. Transfer your dry staples like flour, sugar, pasta, and rice into clear airtight containers. Rectangular containers sit flush against each other and maximize shelf space. You can instantly see exactly how much oatmeal you have left before you go to the grocery store. Throw away the bulky cardboard boxes and free up several inches of valuable vertical space.
Group smaller loose items like granola bars, fruit snacks, and packets of taco seasoning into open-top acrylic bins. Instead of having loose packets sliding all over the shelf, you simply pull out the entire bin to grab what you need. Assign one bin for baking supplies like vanilla extract and chocolate chips. Assign another bin for salty snacks. Label the front edge of the shelf or the bin itself. This keeps the whole family accountable for putting the snacks back in the right spot.

Stack Pots and Space Out Lids Vertically
Cookware cabinets easily turn into chaotic jumbles of metal. Stacking pots and pans directly on top of each other leads to scratched nonstick coatings and chipped enamel. If you must stack your frying pans, place a felt pan protector or a simple paper plate between each layer. Nest the smaller pots inside the larger ones to save space. Keep the handle of the top pan turned slightly away from the handle below it so you can grab it easily without lifting the whole heavy stack.
Lids are the biggest storage headache in any kitchen. Never try to balance a lid on top of a nested pot. Buy a metal wire rack designed specifically for baking sheets and file your pot lids vertically. Stand the lids up on their edges like books on a bookshelf. You can also mount a simple adhesive rail on the inside of the cabinet door to hold the lids flat against the wood. Getting the lids out of the main cabinet frees up massive amounts of flat surface area.
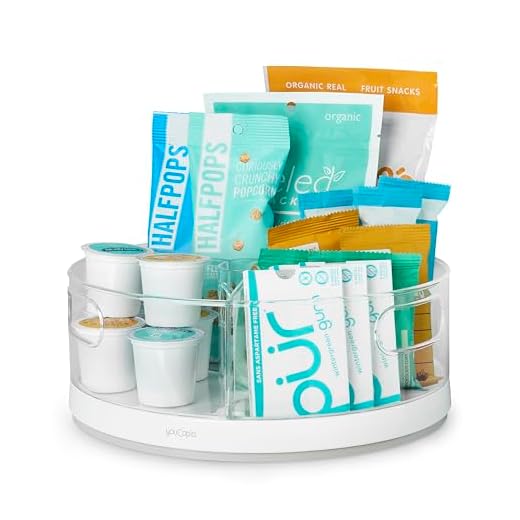
Use Turntables and Risers for Better Visibility
Things get lost in the back of your cabinets because you cannot see them. Canned goods are notorious for this problem. Place a tiered shelf riser in your pantry cabinet. You will be able to see the labels on the cans in the back row just as clearly as the ones in the front. Line up your diced tomatoes, black beans, and chicken broth so the labels face outward. This simple fix prevents you from accidentally buying a fourth can of pumpkin puree because you missed the three hiding in the dark.
Turntables or lazy Susans solve the problem of deep corner cabinets. Place a ten-inch plastic turntable on the shelf to hold your cooking oils, vinegars, and sticky bottles of honey. Instead of knocking over three bottles of vegetable oil to reach the soy sauce, you just spin the tray. Turntables also work perfectly for your spice collection. Keep the frequently used salt, pepper, and garlic powder on the outer edge. Place the obscure spices you rarely use near the center pivot point.
Quick Tips
- Measure your cabinet depth before buying bins. Most upper cabinets are exactly 12 inches deep, while lower base cabinets are 24 inches deep.
- Label the top lids of your spice jars with a white paint pen so you can read them instantly when looking down into a base drawer.
- Stick heavy-duty adhesive hooks to the inside of your under-sink cabinet doors to hang damp dish towels and rubber gloves.
- Store your baking sheets, cutting boards, and muffin tins vertically using tension rods to create cheap custom dividers.
- Keep a small stepladder folded flat in the gap between your refrigerator and the wall so you can safely reach your highest shelves.
Frequently Asked Questions
Organizing your kitchen cabinets completely changes how you cook. You will stop burning dinner while frantically hunting for the right spice. Finding a clean bowl for breakfast becomes automatic. Your kitchen turns from a cluttered stress zone into a highly functional workspace.
Start tonight by picking just one cabinet. Empty the coffee mugs onto the counter, wipe down the wood, and put back only the cups you actually drink from. Once you experience the relief of opening a perfectly ordered shelf, you will want to tackle the rest of the room.
Recommended Products

Copco 3-Tier Non-Skid Spice Rack