Staring at a new food processor sitting in pieces on the kitchen counter feels intimidating. You have a heavy base, a plastic bowl, a lid with a tall chute, and blades sharp enough to take off a fingertip. Most people just pack it back in the box or stick to the simple spinning blade because they are afraid of breaking the machine or turning their dinner into mush. You might have received this appliance as a gift and left it untouched in a cabinet for a year.
You can chop an entire onion in three seconds flat. A machine like this cuts dinner prep from thirty minutes of tedious knife work to just five minutes. Setting it up the first time requires understanding how the safety locks align. If the pieces do not click together in the exact right order, the motor will refuse to turn on. This rigid safety design prevents the blades from spinning while your hands are exposed.
We are going to walk through the assembly, the different blades, and the exact buttons to push. You will learn the difference between pulsing and running the machine continuously, so your salsa stays chunky instead of turning into a watery soup. Let us get this appliance assembled and put it to work right now.
Assembling the Bowl and Base
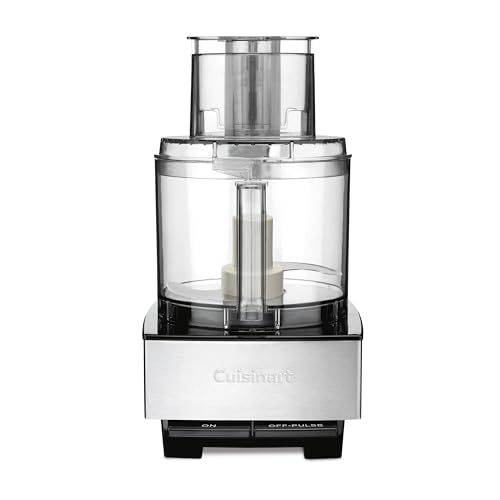
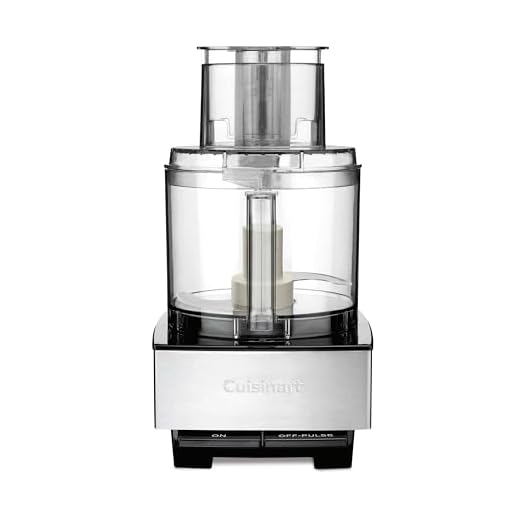
Place the heavy motor base on a flat, dry section of your kitchen counter. Clear away any loose papers or dish towels that the cooling fan underneath the base might suck up. Grab the clear plastic work bowl and set it down onto the center post of the base. You will notice a handle on the bowl. Position this handle just slightly to the left of the center. Twist the bowl firmly to the right. You will hear a loud click when the bowl locks into place. The machine will not start unless you hit this locking point.
The order of operations matters here. Always lock the bowl to the base before you try dropping a blade inside. If you put the blade in first, the friction makes it nearly impossible to twist the bowl into the locked position. Leave the machine unplugged while you do this initial setup. Your fingers are going to be very close to sharp metal components. Take your time feeling how the plastic tracks guide the bowl into the final locked position.
Choosing the Right Blade for the Job
The standard S-blade is the metal attachment that sits at the very bottom of the bowl. This is your primary tool for chopping onions, mincing garlic, pureeing soups, and making pesto. Hold this blade only by the tall plastic center column. Slide it straight down over the middle post inside the bowl. Turn it slightly until it drops all the way down and sits flush against the bottom of the plastic bowl. The blade must sit low enough to scrape the bottom.
Your machine likely came with a large metal disc covered in raised holes and long slots. This is the shredding and slicing disc. You use this for grating a block of cheddar cheese or slicing cucumbers for pickling. To install it, you will first insert a plastic stem adapter onto the center post. The disc rests right on top of that stem, sitting horizontally near the very top of the bowl. The sharp holes should face upward for shredding.
Locking the Lid and Safety Mechanisms
The lid is the final piece of the safety puzzle. Place the lid on top of the bowl with the tall feed tube sitting slightly to the left of the bowl handle. Twist the lid clockwise. The plastic tab on the lid must slide directly into the groove on the handle. When it engages, you will hear a second solid click. Many people struggle with this specific step because the plastic feels stiff straight out of the factory box.
Food processors have an internal safety switch located inside the handle. If the lid tab does not push down into that handle slot completely, the motor stays dead. If you plug the machine in and press the power button to find nothing happens, check the lid. Nine times out of ten, you just need to twist the lid another fraction of an inch to the right. Apply firm pressure to the side of the lid until it snaps in.
The Pulse Button vs. Continuous Run
Look at the front panel of your machine. You will typically see an On button and a Pulse button. Pressing On runs the motor continuously. Use this continuous speed when you want to puree hummus, mix a pie dough, or emulsify a salad dressing. Let the machine run for sixty seconds to get a perfectly smooth texture. The continuous setting is best for liquids and pastes that require constant mixing to break down tough fibers.
The Pulse button is your best tool for controlled chopping. When you press Pulse, the blades spin fast. The moment you let go, the blades stop instantly. This quick start-and-stop action tosses the food up into the air and lets it fall back down onto the blades. Pulse five or six times in one-second bursts to chop rough vegetables like carrots and celery uniformly. Do not hold the pulse button down for more than two seconds at a time.
Using the Feed Tube and Pusher
The tall chute protruding from the lid is called the feed tube. This allows you to add ingredients while the machine is actively running. Inside the feed tube sits a plastic cylinder called the pusher. Always use the pusher to guide food down into the spinning blades. Never put your fingers, a wooden spoon, or a spatula down the feed tube. The blades spin fast enough to shatter a wooden spoon and ruin your entire batch of food.
When slicing pepperoni or shredding a block of cheese, cut the food to fit the width of the tube first. Turn the machine on. Drop the food into the tube and apply gentle, steady downward pressure with the pusher. If you push too hard, the machine will stall or the slices will come out uneven. Let the blades do the heavy pulling. You just need to keep the food pressed flat against the spinning metal disc.
Liquid Limits and Preventing Spills
Your food processor bowl might hold up to twelve cups of dry ingredients, but it cannot hold twelve cups of liquid. If you look closely at the center post of the bowl, you will see it is hollow. If you fill the bowl with soup past the top of that inner post, the liquid will pour straight down through the center and flood the motor base. This creates a massive mess on your counter and can permanently damage the electrical components inside.
Always locate the Max Liquid line printed on the side of the bowl. This line usually tops out around three or four cups. When pureeing hot liquids like roasted tomato soup, work in small batches. Let hot liquids cool to room temperature or wait at least ten minutes before processing. Hot liquids generate steam, which expands inside the bowl and can blow the plastic lid completely off the machine during operation.
Kneading Dough with the Plastic Blade
Many food processors come with a blunt plastic blade that looks exactly like the sharp metal S-blade. This is a specialized dough blade. You use this piece strictly for kneading yeast doughs like pizza crust or sandwich bread. The blunt edges stretch the gluten strands instead of cutting through them. Slide the plastic blade over the center post just like you would with the metal version.
Add your flour and yeast to the bowl first. Pulse the dry ingredients twice to mix them. Turn the machine to the continuous On setting. Slowly pour your warm water and oil through the feed tube while the machine runs. The dough will quickly form a tight ball that spins rapidly around the bowl. Let the machine knead the ball for exactly sixty seconds, then turn it off to prevent the motor from overheating under the heavy load.
Cleaning and Maintenance Basics
Wash the bowl, lid, and blades immediately after you finish cooking. Dried hummus or sticky dough acts like cement in the tiny crevices of the lid. Disassemble all the parts completely. Pull the pusher out of the feed tube. Take the blade out of the bowl. Rinse everything under hot water before loading it into the top rack of your dishwasher. High heat from the bottom dishwasher element can warp the plastic bowl over time.
The motor base requires different care. Unplug the machine from the wall outlet. Wipe the base down with a damp microfiber cloth to remove flour dust and oil splatters. Never submerge the heavy base in water. If food gets stuck in the locking mechanisms, use an old toothbrush to gently scrub the debris out of the plastic grooves. Dry all the components completely before locking the pieces back together for storage.
Quick Tips
- Freeze soft cheeses like mozzarella for twenty minutes before shredding them to prevent the cheese from turning into a gummy ball on the disc.
- Cut large vegetables into uniform one-inch cubes before throwing them into the bowl to get an even chop.
- Add a tablespoon of ice water through the feed tube when mixing pie dough to help the flour and butter bind together quickly.
- Wipe down the rubber gasket on the lid with warm soapy water and let it air dry completely to stop mildew from forming.
- Store the sharp metal blades inside the work bowl when the machine is turned off to keep your kitchen drawers safe.
Frequently Asked Questions
Your food processor will quickly become the hardest working tool in your kitchen once you learn the assembly steps. The locking mechanisms feel rigid the first few times you use them. After a few weeks of snapping the bowl and lid together, the motion becomes pure muscle memory. You will stop dreading recipes that call for three cups of diced carrots or a massive pile of shredded potatoes. The heavy lifting is now completely automated.
Start with something simple tonight. Grab a block of cheddar cheese, attach the shredding disc, and watch the machine grate the entire block in ten seconds. Wash the parts immediately when you finish. Keep the base out on your counter so it is ready for your next meal prep session. Cooking from scratch takes significantly less time when you let a strong motor handle the tedious chopping.
Recommended Products

OXO Good Grips Silicone Spatula Set